
Estoy cada vez más interesada en las posibilidades creativas que ofrece la soldadura de alambre galvanizado. Por un lado es más barato que los muebles del mercado, por otro, no se nos olvide la satisfacción que da hacer las cosas nosotros mismos.
En estas imágenes podéis ver algunos ejemplos de muebles que pueden ser fácilmente reproducibles en miniatura.
I am increasingly interested in the creative possibilities offered by the welding wire. On the one hand, it is much cheaper than market furniture. On the other hand, not to forget how wonderful and satisfying doing things by oneself is.
In this picture, you can see a few examples of furniture, than can be easily duplicated in miniature

Empecemos con los materiales que necesitamos y su precio aproximado.
Un soldador corriente, no es necesario gastarse una fortuna. El mio funciona a 230V, 50Hz y 60W. Me costó algo menos de 18 €. Hay algunos algo mas caros que son interesantes desde el punto de vista de la seguridad, suelen incorporar un soporte que evita que quememos cualquier superficie de forma accidental.
Let's start by listing the material we need and the approximate price in euros.
Soldering iron: an elementary welder is enough, no need to spend a fortune. Mine runs at 230V, 50Hz and 60W. It cost me less than 18 €, but I recommend spend a little bit more to get a better soldering iron from the point of view of safety , they can incorporate a support for the welder, used to avoid burns.

Limpio la punta del soldador con un trapo de cocina ligeramente humedecido con agua.
En esta imagen podéis ver también una lata con una esponja de aluminio dentro. Se usa para limpiar y proteger la punta con estaño cuando hayamos terminado.
I clean the soldering tip with a towelling kitchen rag lightly moistened.
En esta imagen podéis ver también una lata con una esponja de aluminio dentro. Se usa para limpiar y proteger la punta con estaño cuando hayamos terminado.
I clean the soldering tip with a towelling kitchen rag lightly moistened.
You can also see in the picture a tin
can with a steel wool inside. It is used to re-tin the soldering tip
when we finished.

Supongo que al principio es normal estropear una o dos puntas hasta que se le va cogiendo el truco, de modo que os recomiendo un soldador que os permita cambiar las puntas fácilmente.
En la primera imagen podéis ver la primera punta que me cargué, en la segunda después de haberla lijado pues intenté aprovecharla al máximo, pero no funcionó, se puso negra inmediatamente y era muy difícil soldar. En esa fotografía, al lado, podéis ver una punta recién comprada, me costó 0,80 €. La punta roja es un protector que desaparece en cuanto se calienta el soldador.
Y finalmente, una recomendación, no uséis la punta del soldador siempre en la misma posición, pues como veis en la última foto se le puede hacer un agujero.
At the beginning it's easy to spoil one or two tips, so it is important to buy a welder that allows us to change them.
In the first picture I show you my
first soldering tip absolutely shattered due to the misuse.
In the second one, you can see with a
bright copper color, my first soldering tip after being filed, couse
I tried to restore it, but it doesn't work, because it goes black
inmediately and it is very difficult to weld. In this picture, you
can see also a replacement tip that I bought at the hardware store,
0.80 €. By heating this new one, the red protector disappears and
we are ready to work.
And finally in this section, do not use
the soldering tip always in the same position, because it could be
drilled, as you can see in the last picture.

Estaño con alma de resina, se puede encontrar con diferente porcentaje de estaño y plomo. El que yo uso tiene 60% de estaño y 40% de plomo.
Hay también estaño libre de plomo, creo que la aleación es con plata, de modo que será más caro. A mi entender es más difícil soldar con él, pero como todo será cuestión de práctica. De todos modos en una ferretería os ayudarán encantados. El precio está alrededor de 7 u 8 €los 100 gr.
Muy importante, cuando lo compréis, que esté bien brillante.
Tin/lead solders, also called soft solders, are commercially avaible with tin concentrations between 5% and 70% by weight. Mine has a concentration of 60% Sn and 40% Pb with flux core welding.
There are also lead free solders, I
think with a tin-silver alloy, so it is more expensive. But my understanding is that soldering
is more difficult. Aniway, you can find help at the hardware store.
I think the price is around 7 or 8 € the 100gr.
Very important:
when you buy it, it must be shiny.

También vais a necesitas papel de lija para metal. No recuerdo el precio pero era muy poco.
Además flux o decapante para soldar, para mí es elemento clave si queréis conseguir soldaduras rápidas, fáciles y más fuertes.
En este dibujo podéis ver flux líquido, o cremoso. Dura años, pues se usa muy poco, de modo que no compréis mucho. Ronda los 4 €
You will need also sheets of sandpaper for metal. I do not remember the price, but it was very little.
I use also welding flux. For me, this
is a key element to get quickly and easily strong welds.
You can find it liquid and as a cream
(see the picture). A bottle lasts for years and costs around 4 €.

Os recomiendo un soporte para poder agarrar los proyectos, una tabla de madera y cinta de carrocero.
I recomend a helping hand tool
(it facilitates the work a lot) a wooden board and masking tape.

Veamos ahora el proceso de soldado paso a paso. Por favor, trabajad en un sitio ventilado, especialmente si usáis estaño con plomo.
Let's see now the soldering process step by step. Please, work in a ventilated place especially if your soft solder contains lead.
Let's see now the soldering process step by step. Please, work in a ventilated place especially if your soft solder contains lead.

1- Primero lijad el alambre en la zona que queréis la soldadura. En este dibujo podéis ver dos trozos de alambre. El primero lleva la capa galvanizada, cuya función es proteger el alambre de la oxidación, pero estropea el proceso de soldado. El otro trozo de alambre, tras ser lijado, es mucho mas receptivo al estaño.
1.- Sand the galvanized wire where you
want your welds. In the picture you can see two pieces of wire, the
first one with its galvanized coating that protects the wire from
oxidation, but it spoils the soldering process. The second one after
been sanded is more receptive for tin.
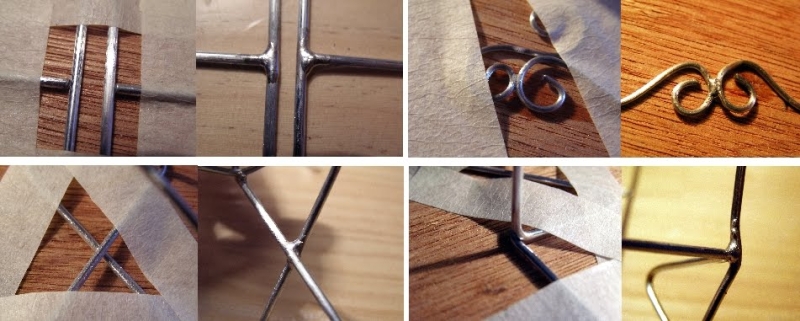
2.- Sujetad los alambres sobre la tabla con la cinta de carrocero. Dependiendo del grosor del alambre, necesitaréis calentar más o menos el alambre.
2.- First attach the wires with your
fastening tools in order to avoid any displacement. Then, heat up the
wire in that positión during a few seconds, it depends on the thickness of the wire.
3.- En este paso hay que trabajar deprisa. Tras calentar bien el alambre, echamos el flux donde queremos la soldadura, ponemos el estaño sobre los alambres y aplicamos el calor del soldador. El estaño se repartirá por capilaridad por toda la superficie donde ha llegado el flux. Quitamos el estaño y después el soldador; por ese orden.
3.- En este paso hay que trabajar deprisa. Tras calentar bien el alambre, echamos el flux donde queremos la soldadura, ponemos el estaño sobre los alambres y aplicamos el calor del soldador. El estaño se repartirá por capilaridad por toda la superficie donde ha llegado el flux. Quitamos el estaño y después el soldador; por ese orden.
3.- In this step, we have to work fast.
We move away the welder for a moment and put the flux on the hot
wires. Then we connect the tin with the hot wires and touch lightly
with the welder. The tin will slide where we put the flux. We move
apart the tin and the welder in that order
Me gustaría en este punto, aclararos tres cosas:
- Primero: no apliquéis el flux antes de calentar el alambre. Pues se quema rápidamente y las soldaduras se vuelven quebradizas.
- Segundo: no estéis mucho rato repartiendo el estaño con la punta del soldador para que la soldadura sea más bonita. Cuanto más tiempo lo calentáis peor soldadura tendréis. Si os quedan pegotes, recordad que podéis lijar después cuando esté frío.
- Último: usad la cantidad justa de estaño, más cantidad no significa mejor soldadura.
I want to clarify three points:
- First: do not apply the flux before
heating up the wire with the welder, because it goes black very
quickly and the welding would be brittle.
- Second: do not be too long spreading
the tin with the soldering tip to get a beautiful weld. The longer
you heat it up, the worse the welding you get. Remember that the weld
can be sanded to soften or reduce it when it gets colder.
- And finally: use the right amount of
tin. More tin no means a stronger weld.
5.- Cuando hayáis terminado lavad la pieza con jabón y secad con un trapo. Ya está lista para ser pintada.
6.- Mi última recomendacion se refiere a como volver a estañar la punta del soldador para que esté lista la próxima vez que la vayáis a usar. En el vídeo que está sobre estas líneas lo explica muy bien.
4.- Let it get colder and do not blow over it.
5.- Finally, wash the entire piece with
soap and dry with a cloth. And it is ready to be painted.
6.- My last recommendation refers to
how re-tinning the soldering iron for preserving it in good condition
for the next time. In this video you have helpful tips.

Sobre estas lineas podéis ver algunos muebles que he realizado y cuyos tutoriales están en este blog.
Espero que esta información os haya servido de ayuda.
Un abrazo
The picture below shows wire furniture that I've made, whose tutorials are available in this blog.
I hope this information helps. There must be some mistakes in the translation. I apologize for that.
Hugs
Merci beaucoup pour ces explications très claires.
ResponderEliminarExcelente!
ResponderEliminarVery useful. Thank you so much!
ResponderEliminarthank you so much - I hope to start welding soon!
ResponderEliminarmuchas gracias!
¡Eres un monstruo! En el buen sentido, se entiende...Te explicas genial y das toda la información detallada.Tus creaciones son magníficas.
ResponderEliminarComo decian hace años; nena, tú vales mucho.
¡Seguiremos en contacto!
Buenisimo tutorial, muchisimas gracias, me ha encantado este sitio
ResponderEliminarHola,mirando lugares en internet de labores, artesanias etc. he visto tus trabajos y he dado con tu blog, no te puedes ni imaginar lo que he gozado leyendo tus explicaciones para hacer una buena soldadura, he recordado a mi padre, los ratos que de pequeña le miraba cuando soldaba y he pensado en lo que disfrutariamos juntos ahora con estos soldadores tan practicos. Gracias por el buen rato que me has hecho pasar y que volvere a buscarte, pues deseo probar hacer algo, me encanta intentar hacer cosas nuevas y ver como me va, si tengo mano o tengo que olvidarme del asunto, yo divido las técnicas en posibles o imposibles, pero despues de haberlo intentado, nunca antes. Un abrazo
ResponderEliminarTHANKS FOR THE INFORMATION
ResponderEliminarExcelente explicacion!Ahora una pregunta me sirve para soldar latas o chapas finas? Espero tu respuesta, muchas gracias
ResponderEliminar